“Sign in with Apple” is a highly secure and private way to sign into third-party apps and websites using your Apple ID. It also makes the entire sign-in process pretty fast and hassle-free. For a change, you do not need to create and remember new passwords, which can prove to be a relief if you are looking for a password-free world. On top of that, Sign in with Apple not only works with Apple devices but also with Android and Windows. Sounds intriguing? In this detailed guide, I’m going to show you how to manage Sign in with Apple apps on iPhone and iPad.
How to Use Sign in with Apple on iPhone and iPad
What is Sign in with Apple and How Does It Work?
Sign in with Apple is a tool that protects your personal information from being exploited by third-party apps and websites. It lets you sign into apps/websites without having to provide your personal information. When you use Sign in with Apple, Apple generates a unique identifier and shares it with the developer to keep your information private. Since this identifier is distinct for each developer, your personal information can’t be gathered and shared everywhere.
Besides the security aspect, Sign in with Apple is an effort to conveniently sign into accounts on various apps and websites and eliminates the need to create and remember new passwords. If you are asked to enter your name and email address, Sign in with Apple will automatically fill in the information from your Apple ID. Moreover, you also get the option to edit your name and share your email.
What Information Does Apple Collect When You Use Sign in With Apple?
Now, you may be wondering what information Apple collects when you use Sign in with Apple. While it knows whenever you use the functionality, it doesn’t see or retain the history of apps you sign in with as this information stays on your device.
One thing you should know is that the first time you use Sign in with Apple with an app, Apple shares a simple binary score with the developer. It’s done for security reasons to ensure that you are a real person. The score that Apple shares are derived from your recent Apple account activity and certain information about your device along with the usage patterns.
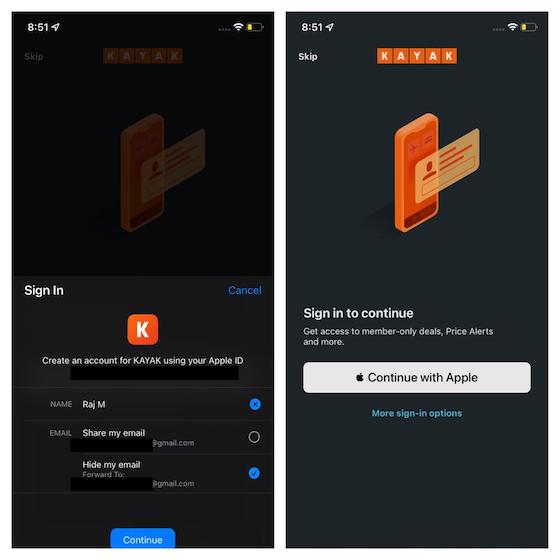
Create an Account Using Sign in With Apple
Creating an account using Sign in with Apple is simple. Before you start, just ensure you have two-factor authentication turned on (Settings -> your profile -> Password & Security -> Two-Factor Authentication).
Once enabled, tap on the Sign in with Apple/Continue with Apple button on the supported app or website. After that, you can choose to share your email or use Hide My Email feature to protect your email. For better security, its best to hide your email. After that, tap on Continue and then confirm using your Touch ID/Face ID or passcode.
Create Sign in With Apple Account on Other Platforms
Much like on iDevices, it’s easy to use Sign in with Apple on the web and other platforms like Windows and Android. Just tap on the Sign in with Apple button on the supported website/app and then enter your Apple ID and password.
There are a few things to keep in mind. When you use the feature for the first time, you will be required to enter a verification code received on your trusted Apple device or phone number. On the web, you can skip the additional verification for 30 days after your initial sign-in by trusting the browser you are currently using.
Popular Apps with ‘Sign in With Apple’ Support
There are a number of apps and websites that include the option for you to Sign in with Apple. Here’s a list of some of the popular ones:
- Adobe Reader
- Kayak
- Dineout
- Dropbox
- Airbnb
- eBay
- Giphy
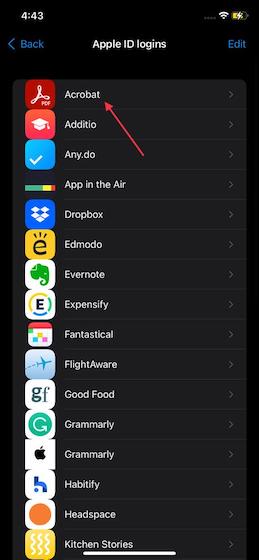
How to View Apps Using Your Apple ID on iPhone, iPad
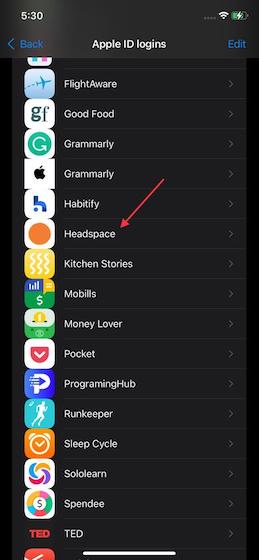
iOS offers a pretty straightforward way to keep a track of all the apps that are using your Apple ID. Here’s what to do:
- Launch the Settings app on your iOS device and then tap on your profile.
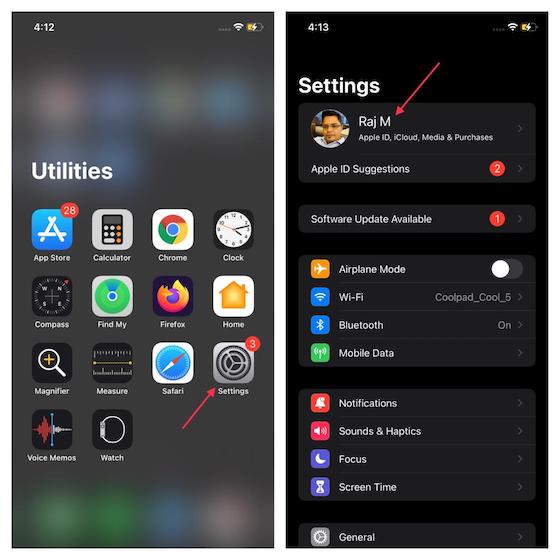
- Now, select Password & Security.
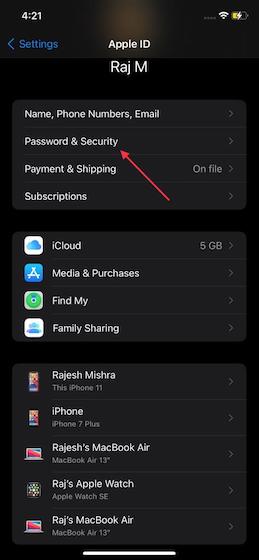
- Next, select Apps using Apple ID located under the Sign in with Apple section.
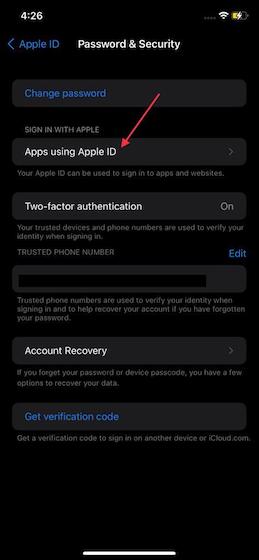
- Here, you will see a long list of apps that are using your Apple ID and that’s how you can view them.

View Apps using Sign in With Apple on Mac, Web
If you want to view the apps that are using your Apple ID on Mac, head over to System Preferences -> Apple ID -> Password & Security -> Edit.
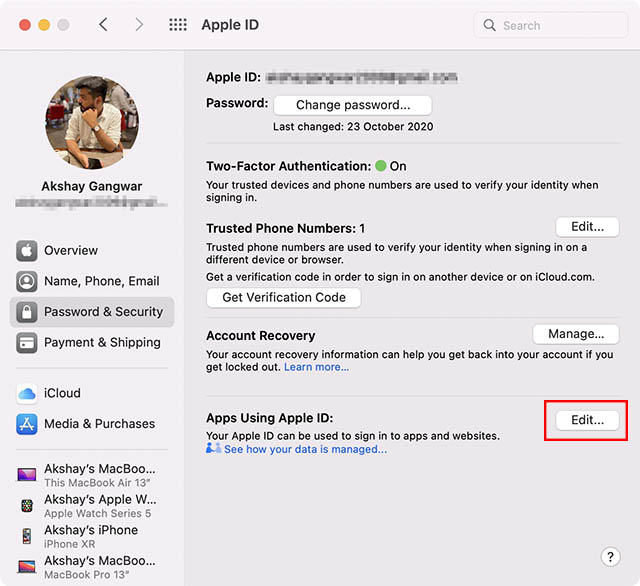
You can also check the Sign in with Apple apps on the web. Navigate to appleid.apple.com -> Security section -> Choose Manage apps & websites located under Sign in with Apple section -> Manage.
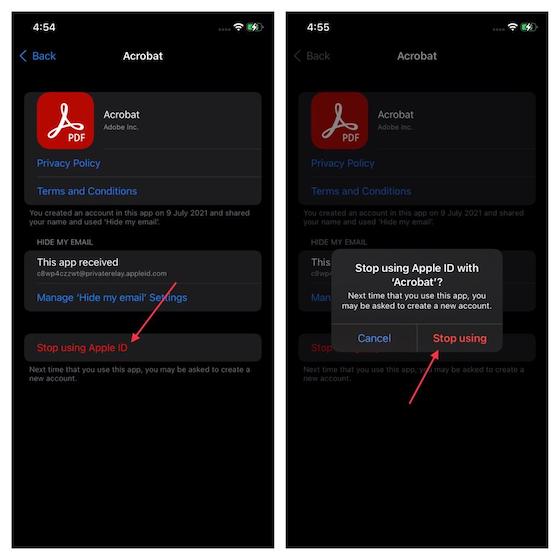
Stop an App from Using Your Apple ID
If you want an app or website to stop using your Apple ID, you can revoke the access with ease. Do note that the next time you use the app, it may ask you to create a new account.
- Head to the Apps using Apple ID section under Password & Security via Profile Settings.
- From the list of apps that appears, select the app that should stop using your Apple ID.
- Next, tap on Stop Using . After that, tap on Stop Using again in the popup to confirm the choice.
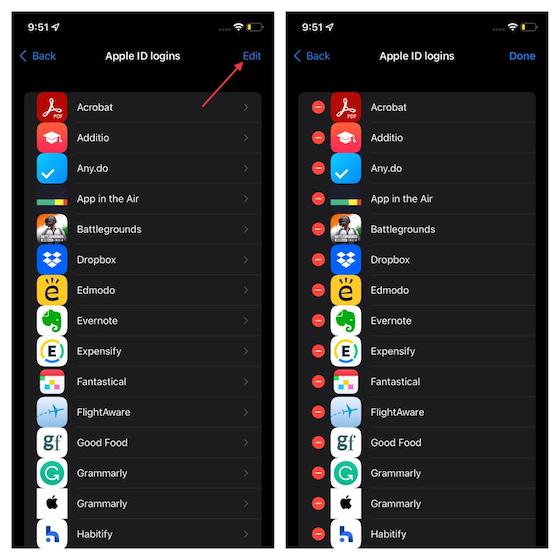
Alternatively, you can tap on the Edit button in the top right corner (on the Apple ID Logins screen). After that, tap on the red minus button (as seen in the screenshot below) to the left of an app and hit Delete. Make sure to tap on Done at the top right to confirm.
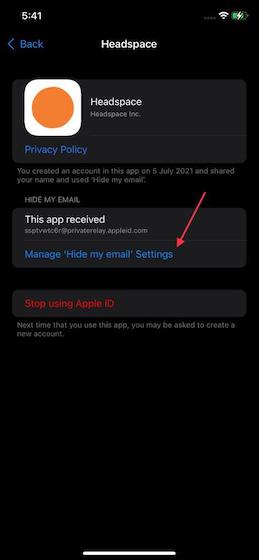
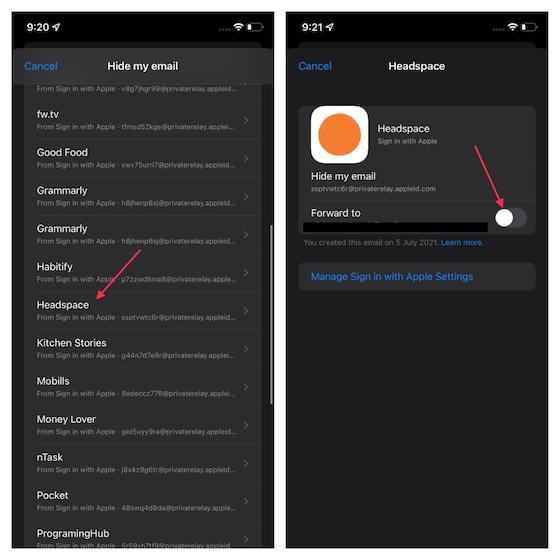
How to Check the Hide My Email Address of an App
As mentioned earlier, Sign in with Apple focuses on the security part and allows you to hide your email from trackers and people with malicious intents. If you want to enable this feature, or check which apps you have enabled it for, here’s what to do:
- Again, head to the Profile section via Settings and reach the Password & Security section. Now, tap on Apps Using Apple ID .
- Now, choose the app for which you want to check Hide My Email Address.
- Check out the “fake” email ID located under Hide My Email section.

How to Change Hide My Email Forwarding Address
Sign in with Apple also offers you the flexibility to change your Hide My Email forwarding address. Just follow these steps:
- As mentioned above, reach the Apps Using Apple ID section via Settings.
- Choose the app and tap on the Manage Hide my email Settings option.
- Next up, scroll down and then tap on the Forward to option.
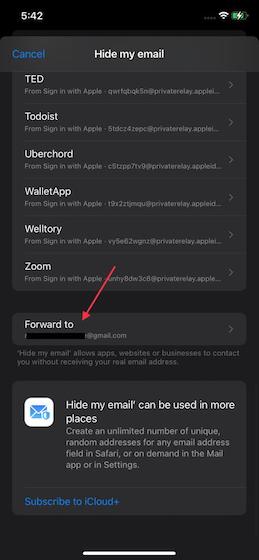
- Here, you will see your email addresses. Select a preferred email address and then tap on Done at the top right to finish.

Disable Email Forwarding for an App Using Your Apple ID
If you no longer want to receive emails from any app, you can choose to turn off email forwarding.
- Via the Settings, tap on Profile, then Password &Security to reach Apps Using Apple ID .
- Again, select the app and then Manage Hide my email Settings .
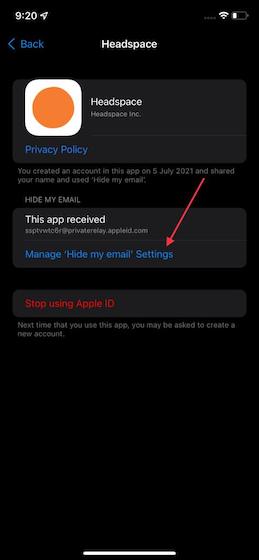
- Next, choose the app and disable the Forward to option.
Note: In iOS 14 or earlier, go to the Settings app -> your name -> Password and Security -> Apps Using Your Apple ID -> choose an app. Now, turn off Forward to.
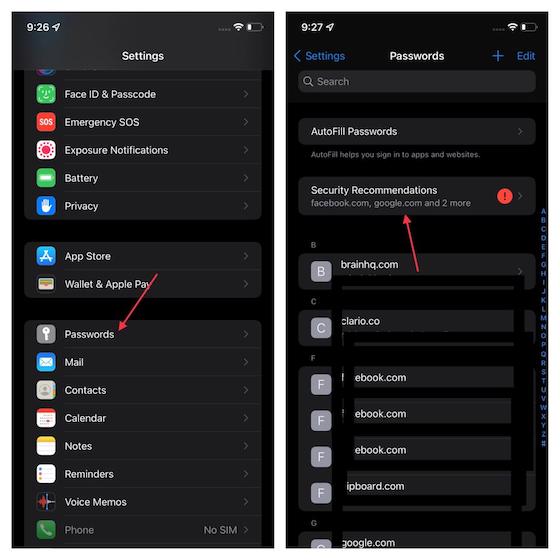
Convert an Existing Third-Party Account into Sign in with Apple
Some supported third-party apps and websites may allow you to upgrade an existing account to Sign in with Apple. Furthermore, if your device is running iOS 14/iPadOS 14 or later, you may also get the option to convert your existing account into Sign in with Apple if the passwords for those accounts are easy to crack. Be warned that after you convert your account into Sign in with Apple, you won’t be allowed to change it back.
- Navigate to Settings app.
- Select Passwords and then select an app or website name under Security Recommendations.
- After that, tap on Use Sign in with Apple and then follow the prompts to complete the process.
Tips to Use Sign in with Apple on iPhone and iPad
An old school bibliophile who turned a tech nerd out of obsession. When he is not digging into hacks and tracking down stories that are breaking the internet, you may find him reciting poems.
Add new comment
Name
Email ID
Δ


- Apple and Google have officially confirmed their team-up for the next-gen Siri AI.
- The Cupertino Giant will be using Google’s Gemini for a more personalized Siri model as well as Apple Intelligence features.
- We can expect the next-gen Siri to come out with iOS 26.4, sometime in March or April.
Apple has officially confirmed joining forces with Google to use its Gemini AI model to power the next-generation Siri. It will offer a more personalized experience and will be coming out with the iOS 26.4 update. Apple also plans to leverage Gemini’s capabilities for other Apple Intelligence features as well, later down the line.
The Next-Gen Siri will be powered by Google’s Gemini AI
Apple officially confirmed that it will be partnering with Google in a statement to CNBC . Here’s what it stated, “After careful evaluation, we determined that Google’s technology provides the most capable foundation for Apple Foundation Models, and we’re excited about the innovative new experiences it will unlock for our users.”
Later, Google also shared a post on X confirming the tie-up, “Apple and Google have entered into a multi-year collaboration under which the next generation of Apple Foundation Models will be based on Google’s Gemini models and cloud technology. These models will help power future Apple Intelligence features, including a more personalized Siri coming this year.”
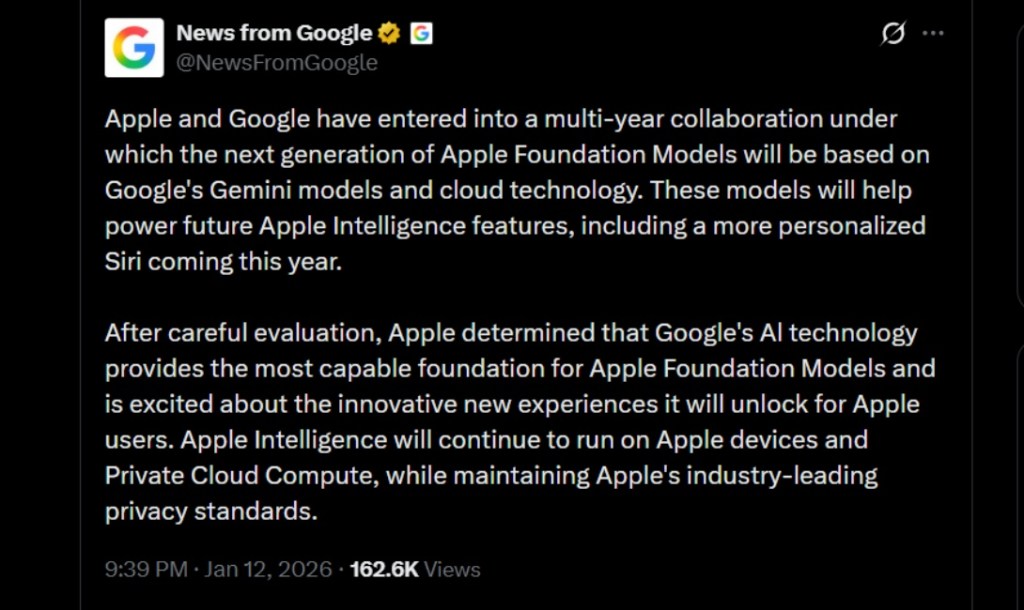
Image Credit: X/@NewsFromGoogle
Both statements clearly mention that the Cupertino Giant will be using Gemini to power its assistant Siri. This was already rumored, as Apple’s attempts to acquire Perplexity went nowhere. With Gemini, Siri will get a major AI update . It will be able to handle more nuanced conversations and provide better results. Something long-time Apple users have been asking for years.
The next-gen Siri will arrive with the iOS 26.4 update, which will launch sometime in March or April. And it is only going to be available for Apple Intelligence-supported devices .
Something else worth noting is how Google’s statement mentions that Gemini will power Apple Intelligence features. This leads us to believe that Apple could use Gemini’s multi-modal capabilities for its Writings tools , Image Playground , and Message summaries, too.
Elon Musk Not Happy With Apple and Google Tie Up
xAI CEO Elon Musk also responded to Google’s announcement post on X, sharing his thoughts on the matter by saying, “This seems like an unreasonable concentration of power for Google, given that they also have Android and Chrome.” Though we don’t expect either Apple or Google to respond to Elon, we will update the situation as it progresses.
It is worth noting that xAI is the company behind Grok, which is in hot water currently due to its inappropriate image generation fiasco , and has been getting backlash from multiple news outlets, X users, and even government authorities.
With over 4 year of experience under the belt, I cover all facets of consumer tech, from smartphones to other consumer electronics, our favorite social media apps, as well as the growing realm of AI and LLMs. As an Apps and AI writer app Beebom, I provide my expertise in all these areas, weaving stories that help you get familiar with the tech around you. But you will find me playing NYT daily puzzles in my free time.
Add new comment
Name
Email ID
Δ
