Making 2D animations is common for Procreate users. However, with the Procreate 5.2 update, you can not only paint over 3D objects but animate them right on your iPad as well. These animated objects can then be exported as animated images and video files with ease. The 3D painting and animation feature works on most iPads, including the M1 iPad Pro and the new iPad mini 6 . So, for 3D enthusiasts or artists excited to learn how to use this feature, let’s dive right in and figure out how to animate 3D objects in Procreate.
Animate 3D Objects in Procreate (2021)
Animating 3D objects in Procreate isn’t as powerful as other popular 3D modeling CAD tools or game engines. Even with 3D capabilities, Procreate is still an artistic tool at its core. So, you can only expect some basic animations out of it and nothing beyond that.
What are the Animation Effects for 3D Objects in Procreate
In Procreate, the animation options are provided while exporting 3D objects. These are only there for presentation purposes, and for now, hold no practical use. Let’s quickly learn about the default options before learning how to animate 3D objects and export them.
Animated Rotate
As the name suggests, this effect makes the 3D object rotate around a certain point. The rotation works like a zoom effect too with the object changing its distance from the camera. If you place multiple light sources in Procreate , you can see their light reflect against the 3D object when it rotates. Rotation is a great way for you to present your models from all sides.

Animated Swing
Functionality-wise, this effect is similar to Animated Rotate. But instead of doing a full 360-degree rotation, the object here swings back to its original position after a 180-degree movement when it’s closer to the camera. It also can have additional zoom and lighting effects that help you add depth to your 3D model.

For now, these options can seem a little limited, but we can expect to see more animation effects bring added in future Procreate updates. Both of these animated options can have custom speed (or ease). You can also adjust the zoom level and duration of the animation before exporting a 3D object. Other than these basic options, each exporting format offers some exclusive features. We will focus on them in the next section.
Animated Export Options for 3D Models in Procreate
There are multiple animated exporting options available in Procreate. The effects in each of these options remain the same but the internal settings can vary slightly. Let’s get started and animate 3D objects in Procreate.
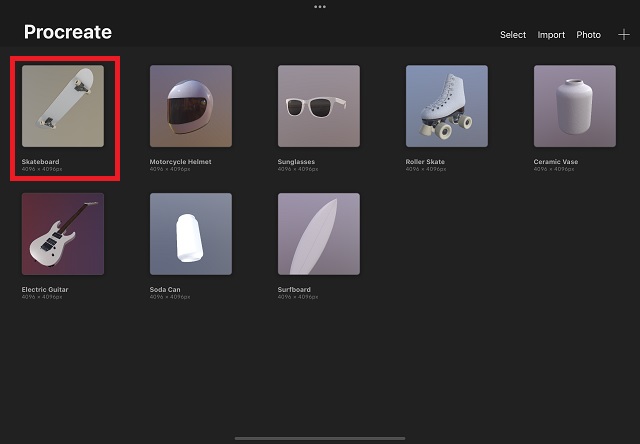
- Start by opening the 3D model you want to animate by tapping on it from the Procreate homescreen. For this tutorial, we will use the 3D Skateboard, which is a part of sample 3D models provided by Procreate.
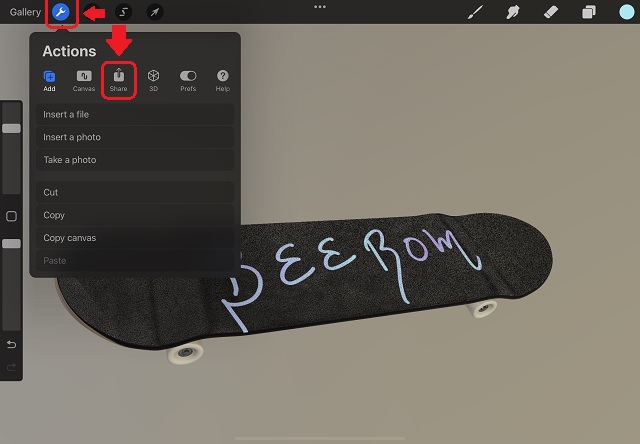
- Then, tap the “ Actions “ button marked by a wrench icon at the top left corner of the screen. Once the Actions menu opens, tap on the “Share” button.
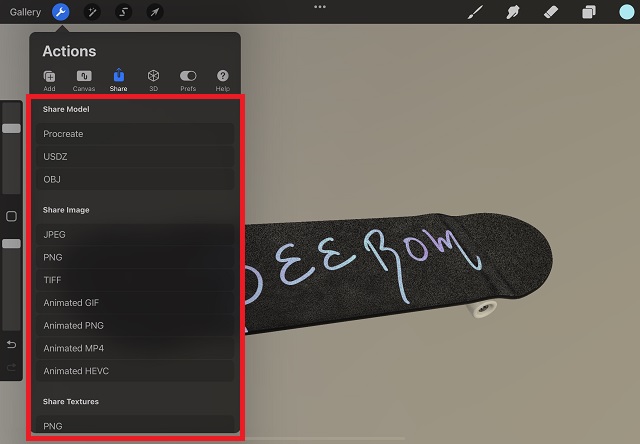
- Finally, you will have a variety of sharable file extensions, including the standard Procreate, USDZ, and OBJ options, along with some animated options. You can tap on any of the desired animated formats to load up options related to it. Let’s go over each of these animated options before you make your decision.
Animated GIF
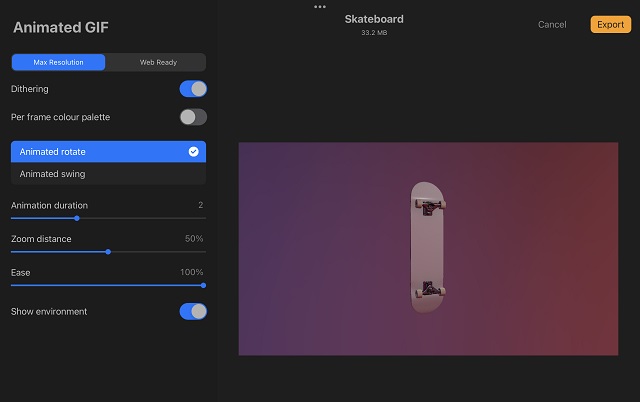
GIFs are probably the simplest animated formats to use. These do not support audio, so they are also usually lighter and lower quality than other animated file formats.
Procreate offers GIFs in two resolutions – the “Max Resolution” renders out the GIPS in 720p resolution, which is heavy in size. Meanwhile, the “Web Ready” option optimizes the quality and reduces the size of the overall file. Among the exclusive options, this format allows you to turn on/ off Dithering. It’s a form of noise applied over images to reduce their distortion even at larger scales. You can also allow per frame color palette to export more accurate colors, but that’s barely noticeable in the animated GIF.
Animated PNG
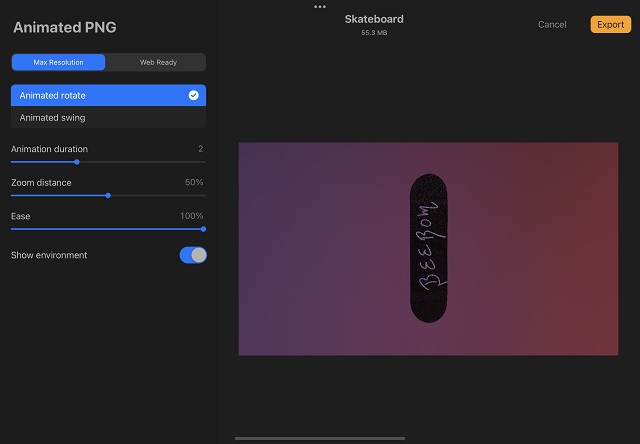
In theory, animated PNG is similar to GIF files. But these have better colors, some level of transparency, and overall higher image quality. Procreate allows you to export 3D models at “Max Resolution” and “Web Ready” resolution. However, if you plan to share your 3D model online, you might want to reconsider your choice.
Animated PNG sounds good in theory but isn’t supported by most platforms. For example, even the iPad’s Photos app shows it as a static PNG when exported from Procreate. If you need a low-quality file for easy sharing, GIF is still the way to go. For higher quality, you can always stick with an MP4 file.
Animated MP4
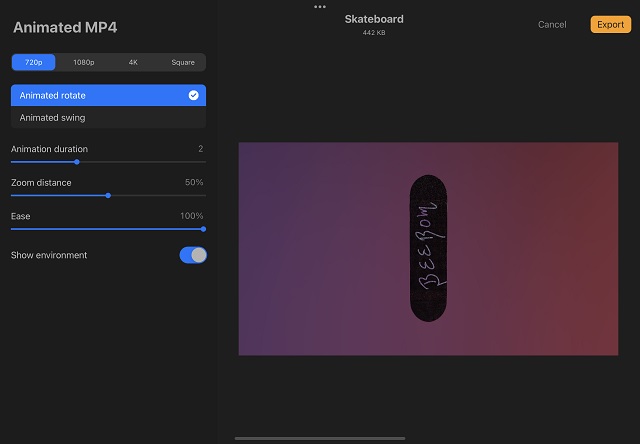
The most popular and reliable option among users is MP4. Procreate, other than animation effects, only offer options to choose the resolution of the MP4 file . You can export an MP4 at up to 4K resolution. If you plan on uploading your work to social media platforms like Facebook or Instagram, choosing “square” is the better choice. It will automatically bring the animated 3D object into focus. Most of the empty space in the frame will be cropped out.
Animated HEVC

The final export option offered by Procreate for animated 3D objects is HEVC. It is a comparatively lesser-known file format . You can expect the same quality and resolution as MP4 while using HEVC. The only additional option it provides is a transparent background. The HEVC file will function like any other video file, and just like a transparent PNG, you can place it over different backgrounds with ease. The maximum resolution for HEVC that Procreate offers is 4K.
How to Export Animated 3D Objects in Procreate on iPad
After choosing the desired format and making the adjustments, all that’s left for you to do is save the file.
- To save your animated 3D file, tap the “ Export ” button on the top right corner of the export screen.

- Once the loading finishes, Procreate will open up the share sheet and ask you to take action on the file. You can either share the exported file through Airdrop, the Mail app, or a popular messaging app like WhatsApp , Telegram, or others. Yeah, you can use WhatsApp on iPad with ease , and we have a detailed guide for it on your website. You can also choose the “ Save to Files ” or “ Add to Photos ” option to save the animated 3D model locally on your iPad.
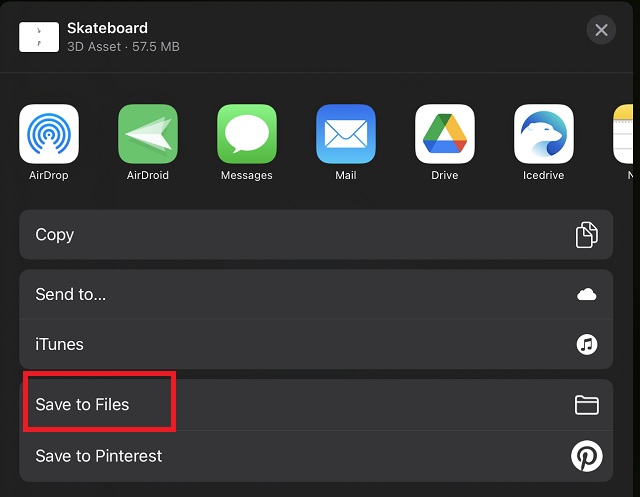
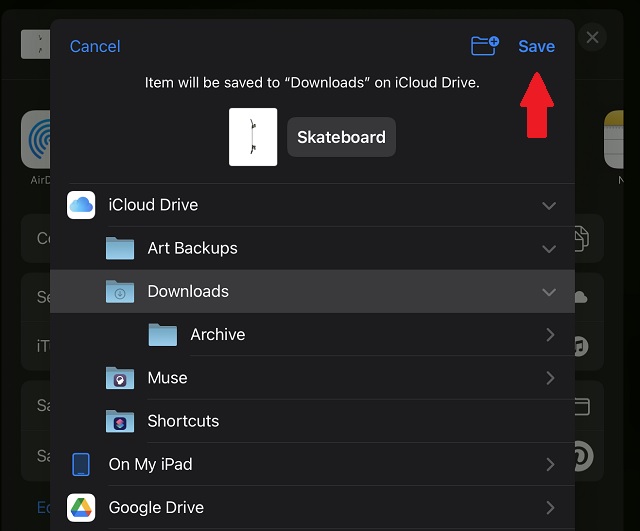
- To save 3D files locally, tap the “Save to Files” option and choose an appropriate location on your device. Then, tap the “ Save ” button at the top-right corner of the pop-up window. You can even save your 3D models to iCloud or other installed cloud storage apps .
Easily Animate 3D Objects in Procreate in a Few Steps
Bringing the latest in technology, gaming, and entertainment is our superhero team of staff writers. They have a keen eye for latest stories, happenings, and even memes for tech enthusiasts.
Add new comment
Name
Email ID
Δ


The iPad remains an ever-popular mobile tablet. Millions of users across the world use the iPad for many things, ranging from entertainment and communication to general productivity. The latter part of the workforce that uses iPad professionally lauds it for its multitasking features and intuitive additions like QuickNote . If you are part of the generation that gets work done on the iPad, you probably have a few documents lying around on it. However, when the time comes to print them, we usually resort to our PCs. But what if you want to print documents from your iPad? Thankfully, there are multiple ways to do so. Learn how to print from your iPad in this article.
While the easier way to print from an iPad is through Apple AirPrint, we will also detail additional methods in this tutorial. Use the table below to jump to a relevant section.
What is Apple AirPrint on iPad and iPhone?
The easiest way to print files and media from the iPad remains Apple AirPrint . AirPrint is a technology that lets users print anything wirelessly without the need of installing any additional drivers or going through multiple setup screens. AirPrint works with many native Apple apps like Mail, Safari, Notes, Maps, and even Adobe Acrobat, among many others.
However, AirPrint has its own set of requirements, and the most important being that you need to own a supported printer. When AirPrint was initially launched, only selected HP printers were compatible. However, as time has passed, many manufacturers have made their products AirPrint friendly. To find out if your printer supports Apple AirPrint, visit this AirPrint Supported Devices list and search for your model. You can also look for the “Works with AirPrint” sticker on your printer.
How to Print from iPad with AirPrint
The following steps will show you how to print from your iPad with AirPrint. However, before we begin, make sure your iPad and AirPrint-supported printer are connected to the same Wi-Fi network. This way, the iPad will automatically detect your compatible printer. Once that’s out of the way, follow the steps below:
Open the file you want to print. We will be using Adobe Acrobat ( Free ) to print a PDF file in this tutorial.
After opening the file, tap the ellipsis icon (three dots) on the top right corner.

- From the drop-down menu, find and tap the “Print” button .

You will now see a print menu with various options available. As you can see below, my AirPrint compatible printer has already been detected and auto-selected on my iPad. To select some other printer, tap the Printer button and choose the one you want to use. Furthermore, you can make other changes such as the number of copies, color options, and more.
- Once happy with your settings, tap the blue “ Print ” button on the top right corner.

And that’s it! Your chosen document will now begin to print, and you can collect the same from your printer. As mentioned above, this works for most native apps, including Safari and Photos, so feel free to print any and all types of media from your iPad.
How to Print from Your iPad Without Airprint
Method 1: Use Your Printer’s Official App
If your printer does not support Apple AirPrint, you can still print your documents and photos from your iPad, but it will require a bit more work. Most major printer makers like HP and Canon have apps for iPadOS. They allow their products to print documents without AirPrint support. So if you learn that your printer comes without AirPrint, download these apps and use them on your iPad.
Since the list of potential apps is vast, we won’t list them all in this article. To find if your printer has an official app, search the App Store or read your printer’s instruction manual. However, we will be detailing one of the apps for HP owners. Called HP Smart ( Free ), the app allows supported printers to print documents without AirPrint.
How to Set up HP Smart App to Print from iPad
Download and install the app, and then follow the steps below to print a document or photo from your iPad without AirPrint.
Open the HP Smart app on your iPad.
Tap the blue-colored “ Set up a New Printer ” button.

- On the next screen, tap OK to give the app permissions to access your Bluetooth and Local Network to set it up.

- You will then see your printer’s name on the right sidebar. Here, tap it once to set up the printer , and you are all set!

Your HP printer has now been set up and is ready for use. Keep reading to learn how to print documents from the app itself.
Print from iPad with the HP Smart App
- Open the HP Smart app on your iPad and move to the “ View & Print ” tab from the bottom navigation bar.

- Depending on what kind of file you want to print, either choose “ All Files ” to access your iPad’s documents or “ My Photos ” for images. You can even link your other cloud storage accounts, like Google Drive , Box, and others, to access your documents stored online.

- We will select the “All Files” option for this tutorial. Once the file manager opens up, use the sidebar to navigate to the file you want to print.

- Tap the file once you have found it and open it up.

- You will now see a preview of your document, along with Print, Share, and other options. Tap the “ Print ” button at the bottom.

- The next page will present you with a list of options you can adjust to your liking. It includes the paper size, color option, print quality, and more options. Once happy with your decisions, tap the blue “ Print ” button.

And voila! Your documents/ images will begin to print from your iPad without having to use the AirPrint technology.
Alternate Method: Print from Within Apps Using HP Smart on iPad
However, if you don’t want to go through all this hassle, leave the HP Smart app open in the background. Then, go to an app like Safari or Notes and choose the “ Print with HP Smart ” option after clicking the ellipsis icon (three dots) at the top. It will direct you to the same page you see in Step 6 above.

While these steps are a bit tedious, they are necessary if you want to print something without AirPrint on your iPad. However, we have an additional method if you find your printer does not have an official app.
Method 2: Use a Third-Party App to Print from iPad
If your printer does not support AirPrint and doesn’t have an official app, you will need to use third-party software to print documents from your iPad. This software will use your computer and iPad to create a bridge between your printer . It will receive the print commands from your iPad on PC and relay them to your printer.
To use this software, your iPad, computer, and printer all will need to be connected to the same Wi-Fi network to share a connection. Once that’s done, you need to purchase one of the software below and get to work. Like we stated above, most of them are paid, so be ready to shell out some money.
1. Printer Pro by Readdle

Available natively on the iPad, Printer Pro allows printing documents wirelessly from your iPad and iPhone with ease. You can print documents, emails, webpages, and even items from your clipboard. The app first installs a lite version to see if your printer will work with it or not.
Download Printer Pro by Readdle (Paid, $6.99 )
2. handyPrint

This software allows printers without the AirPrint protocol to print from iPads, iPhones, and even iPods. And, it uses a Mac as a mediator for the printing process. The software is free to download, but you can support the developer with donations if you wish.
Download handyPrint for Mac ( Free )
3. Printopia

This paid software is a tad expensive at $19.99 , but offers a seamless way for Mac users to print their favorite documents on non-AirPrint printers. Printopa gives you full control over your printer and advanced settings you can tinker around with. Check out the 7-day trial and see if it works for you.
Download Printopia for Mac (7-day Free Trial, then $19.99 )
How to Print from Your iPad Using a USB Cable
This method is heavily reliant on whether your printer will support a direct connection to the iPad. You will also need a USB to lightning cable (or a USB-C cable for new iPad Pro and Air models) to connect your iPad to the printer. To find out if your printer supports a USB connection like that, refer to its instruction manual.
Once a connection has been made, you should be able to print any documents or images by using the iPad’s share button. Just choose the “Print” option from the list, and you will see your printer exactly like the steps above.
Alternate Method: Transfer Documents to Your PC
If all else fails or if the above methods are too complicated, perhaps you are better off going about printing documents the classic way. We recommend choosing the stack of files you want to print and transferring them to your computer. You can either do this by mailing the files, uploading them to a cloud service like Google Drive , or physically connecting your iPad to the PC.
However, the way we recommend is much easier and way faster. We suggest you use a website called Snapdrop , using which you can transfer files across all your devices – be it Windows or Mac. It’s a web-based app, completely free to use, and lightweight. Learn how to transfer files across devices using Snapdrop here.
Print from Your iPad in a Few Easy Steps
Bringing the latest in technology, gaming, and entertainment is our superhero team of staff writers. They have a keen eye for latest stories, happenings, and even memes for tech enthusiasts.
Add new comment
Name
Email ID
Δ
